Few office disruptions are as frustrating as a document scanner grinding to a halt with a paper jam. Whether you’re in the middle of a critical digitization project or just trying to get through the daily paperwork, a jammed scanner can derail your productivity. Understanding the root causes of these interruptions and knowing how to resolve them quickly, along with implementing effective preventative measures, is crucial for maintaining a smooth workflow. This comprehensive guide will equip you with the knowledge and practical steps to tackle paper jams head-on, ensuring your document scanner operates efficiently and reliably.
Understanding Document Scanner Paper Jams
What exactly triggers a document scanner paper jam? Often, a jam isn’t just random; it’s a symptom of an underlying issue, ranging from improper document handling to maintenance oversights. Recognizing these common culprits is the first step toward effective troubleshooting and prevention.
Paper jams occur when a document fails to feed correctly through the scanner’s paper path, becoming stuck or crumpled. The causes can be diverse, including documents that are torn, wrinkled, or otherwise damaged, leading to misfeeds as the rollers struggle to grip them. Foreign objects like staples, paper clips, or even small debris can also obstruct the paper path, causing immediate stoppages. Additionally, a common and often overlooked cause is dirty or worn feed rollers, which lose their traction over time, causing documents to slip or double-feed. Sometimes, what appears to be a jam is actually a “phantom jam” — an error triggered by obscured sensors, leading the scanner to halt even when no physical blockage exists. Addressing these issues proactively can save significant time and hassle.
Immediate Actions When a Jam Strikes
When your document scanner signals a paper jam, your immediate reaction can significantly impact how quickly and safely you resolve the issue. Rushing to pull out the paper forcefully can exacerbate the problem, potentially damaging both the document and the scanner’s internal components. Instead, a methodical approach ensures a safer and more effective resolution.
The first and most critical step is to stop the scanning process immediately. Power off the scanner and, if possible, disconnect it from the power source. This prevents further damage to the machine and protects you from any moving parts. Avoid the temptation to yank the jammed paper out; this can tear the document, leaving small, difficult-to-remove fragments within the scanner’s intricate paper path. Instead, locate the jam by opening the appropriate access covers. Many modern scanners have indicator lights or software messages that pinpoint the general area of the jam, guiding you to the right section for inspection.
Step-by-Step Guide to Clearing Paper Jams
Clearing a paper jam effectively depends on the type of scanner you have and the nature of the jam itself. While the general principles remain the same—power off, open access, gently remove—the specifics can vary between automatic document feeder (ADF) and flatbed scanners.
Clearing Jams in ADF (Automatic Document Feeder) Scanners
Table is empty.ADF scanners are designed for high-volume scanning, but their complex paper paths make them more susceptible to jams.
- Power Down: Always begin by turning off your scanner and unplugging it from the power outlet. Safety first.
- Open Access Covers: Most ADF scanners have multiple access points—lids, side panels, or trays—that can be opened to reveal the paper path. Consult your scanner’s manual if you’re unsure where these are located.
- Locate and Gently Remove Paper: Once the covers are open, carefully locate the jammed paper. Gently pull the paper in the direction it was feeding. If you pull against the feed direction, you risk damaging the rollers or tearing the paper. If the paper is crumpled, try to straighten it slightly to facilitate removal. Remove any large pieces of paper first.
- Inspect for Fragments and Debris: After removing the main obstruction, meticulously check the entire paper path for small, torn pieces of paper, staples, paper clips, or any other debris that might have fallen inside. Even a tiny fragment can cause future jams.
- Clean Rollers and Sensors: While the covers are open, take the opportunity to clean the feed and separation rollers with a lint-free cloth lightly dampened with distilled water or a manufacturer-approved roller cleaner. Also, wipe down any visible sensors to prevent “phantom jams.”
- Close Covers and Test: Ensure all covers are securely closed, reconnect the power, and turn the scanner back on. Load a test document to confirm the jam is cleared and scanning resumes normally.
Addressing Jams in Flatbed Scanners
Flatbed scanners typically experience fewer paper jams since documents are placed manually on a glass platen. However, misfeeds or obstructions can still occur.
- Power Off: As with ADFs, power down and unplug the flatbed scanner.
- Lift Lid and Inspect: Lift the scanner lid. Inspect the glass platen and the areas around it for any foreign objects, such as dust, debris, or even small forgotten notes that might interfere with the scanning mechanism.
- Check Document Placement: If a “jam” message appears on a flatbed, it often indicates improper document placement or an issue with the sensor detecting the document. Ensure documents are placed flat and aligned correctly with the guides.
- Clean Glass and Sensors: Use a soft, lint-free cloth and a non-abrasive glass cleaner to wipe the scanner glass and any visible sensor strips. Smudges or dirt can sometimes trick the scanner into thinking there’s an obstruction.
- Close Lid and Test: Close the lid firmly, power on the scanner, and try a test scan.
Advanced Troubleshooting for Persistent Jams
Sometimes, despite your best efforts, paper jams persist, or your scanner continues to report errors even after clearing visible obstructions. These situations often point to deeper issues that require more advanced troubleshooting.
Begin by performing a full scanner reset, which often involves powering off the device, unplugging it for a few minutes, and then restarting. This can clear temporary software glitches that might be incorrectly reporting a jam. If the problem continues, consider updating your scanner’s drivers and firmware. Outdated software can sometimes lead to communication errors between the scanner and your computer, manifesting as feeding issues or false jam alerts.
> “Frequent or unexplained paper jams are often a silent cry for attention. While a physical blockage is the obvious culprit, many issues stem from aging components like worn rollers or dirty sensors that simply aren’t doing their job anymore. Regular maintenance isn’t just about cleaning; it’s about anticipating these failures before they bring your workflow to a halt.” – Maria Chen, Document Digitization Specialist
Another common cause of persistent jams is worn-out internal parts, especially the feed rollers and separation pads. These components are designed to grip and separate individual pages, and over time, they lose their texture and effectiveness. If you notice documents slipping, double-feeding, or jamming consistently, these parts may need replacement. Many scanner manufacturers offer maintenance kits that include new rollers and pads, often with instructions for DIY replacement. Carefully inspect the paper path for any visible damage to plastic guides or small sensors, as these can also contribute to feeding problems.
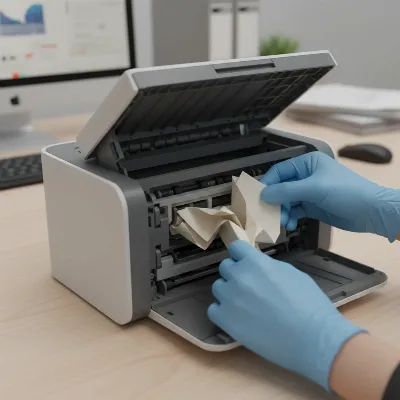 Technician carefully removing jammed paper from an open document scanner ADF
Preventing Document Scanner Paper Jams
While knowing how to fix a paper jam is essential, preventing them in the first place is far more efficient. Implementing best practices for document preparation and scanner maintenance can drastically reduce the occurrence of jams and extend the life of your document scanner.
The most crucial preventative measure begins with proper paper preparation. Before loading documents into your ADF, always fan the stack to loosen the pages and remove any static electricity. Carefully check each document for staples, paper clips, sticky notes, or any adhesive flags, as these are primary culprits for snags and tears. Inspect paper condition; avoid feeding curled, wrinkled, folded, or torn pages, as these are highly prone to jamming. For such documents, use the flatbed scanning option if available.
Ensure you are using the correct paper type and weight specified by your scanner’s manufacturer. Papers that are too thin, too thick, or have an unusual coating might not feed reliably. Overfilling the ADF tray is another common mistake; always adhere to the maximum capacity recommended by the manufacturer to prevent misfeeds and excessive stress on the feeding mechanism. When loading documents, ensure they are properly aligned within the feeder guides.
Regular cleaning and maintenance are paramount. Over time, paper dust, ink residue, and other debris accumulate on feed rollers, separation pads, and optical sensors. This build-up reduces the rollers’ grip and can obscure sensors, leading to misfeeds and false jam reports. Establish a routine cleaning schedule, using manufacturer-recommended cleaning kits or a lint-free cloth with distilled water. Pay particular attention to the feed rollers and the glass strips/lenses where documents pass. Following these simple, consistent steps can keep your document scanner running smoothly for years.
When to Seek Professional Assistance
While many paper jam issues can be resolved with DIY troubleshooting and regular maintenance, there comes a point where professional help is the wisest course of action. Recognizing when to call in an expert can save you from inadvertently causing more damage to your valuable equipment.
If you find that paper jams are occurring with increasing frequency, despite diligent cleaning and proper document handling, it could indicate a more serious underlying mechanical problem. Visible damage to internal components, such as broken plastic guides or extensively worn rollers that you cannot replace yourself, also warrants professional attention. Furthermore, if you are uncomfortable opening your scanner or attempting to disassemble parts, seeking expert assistance is advisable to prevent voiding warranties or damaging sensitive electronics. A qualified technician can diagnose complex issues, replace specialized parts, and ensure your document scanner is properly calibrated, restoring its optimal performance and extending its operational lifespan.
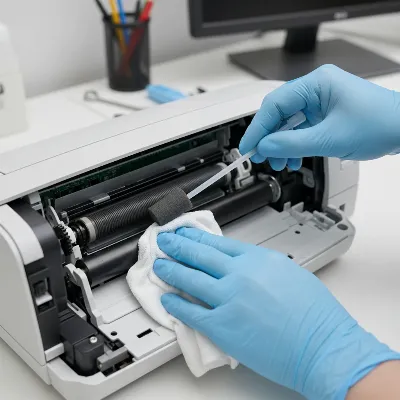 Technician cleaning feed rollers inside a document scanner to prevent paper jams
Conclusion
Document scanner paper jams, though common, don’t have to be a major roadblock in your daily operations. By understanding the typical causes, adopting a methodical approach to clearing jams, and diligently implementing preventative maintenance, you can ensure your document scanner remains a reliable tool for digitizing your documents. From proper paper preparation to routine cleaning of critical components, each step contributes to a smoother, more efficient scanning experience. Investing a little time in prevention and effective troubleshooting will ultimately save you countless hours of frustration and potential repair costs, keeping your workflow uninterrupted and your productivity high. What are your go-to preventative measures for keeping your Document Scanner jam-free?
Frequently Asked Questions
What should I do first when a paper jam occurs in my document scanner?
Immediately stop the scanning process, power off the scanner, and unplug it. This prevents further damage and ensures your safety. Avoid pulling the jammed paper forcefully until you’ve opened the necessary access covers to locate it.
Can dirty rollers cause paper jams in my document scanner?
Yes, absolutely. Dirty or worn feed rollers are a very common cause of paper jams. Over time, paper dust and ink residue accumulate on the rollers, reducing their grip and causing documents to slip, misfeed, or double-feed. Regular cleaning is essential.
How can I prevent recurring paper jams in my document scanner?
To prevent recurring jams, always prepare documents by fanning them and removing staples/clips. Use the correct paper type and weight, avoid overfilling the ADF, and perform regular cleaning of the rollers and paper path with manufacturer-approved cleaning supplies.
Is it safe to use tweezers or tools to remove jammed paper?
It’s generally best to avoid using sharp metal tools like tweezers inside your scanner, as they can scratch delicate internal components or sensors. If you need to dislodge a stubborn piece, try plastic tweezers or a soft, lint-free cloth wrapped around a non-sharp object, but always exercise extreme caution.
What is a “phantom” paper jam, and how do I fix it?
A “phantom” paper jam occurs when the scanner reports a jam error, but no physical paper is actually stuck. This is often caused by dirty or obscured optical sensors within the paper path. Cleaning the scanner’s sensors with a soft, lint-free cloth can usually resolve this issue.